Please Wait...
Brief: this plugin allows the members to invite their friends via email to register on the website.
Firstly: settings:
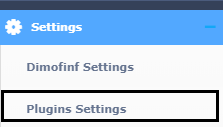
1- Login to the control panel
2- from the side list, select (settings)> then (plugins settings) as the picture below:
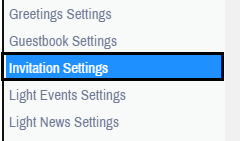
3- the settings list will show up, choose (Invitation settings) as the picture below:
The below page appears:

-Enable invitations: to activate or deactivate the plugin.
-Allow registration only for users with hash invitation codes: this option allows only invited persons to register on the website.
-Validity Period: set the number of days which after the validity of the invitation will expire.
-Invited Members User Group: choose the users group to which the invited person will be added after registration.
Secondly: how is the member using the plugin:
The member can send and list invitations by following the below steps:
1- Login to the website homepage.
2- Press (edit profile) from the admin list.
3- Select “invitations”.
4- All the sent invitations are shown whether they are used or not.
5- To send a new invitation, press “invite friend”.
6- A new window with the below data is shown up:
-By Email: choose this option if the invitation is sent by email.
-Manual (copy & paste): this option refers to the invitation code is sent to the member manually without mailing.
-Email address: enter the email that the invitation is sent to.
-Message: enter a message to be shown to the invited person.