Please Wait...
Brief: after creating section, you would need to add contents to be displayed on the website.
What mentioned below is explaining how to add content to the reservation module:
Note: Contents can be added by two ways;by using the control panel or the section page shown to the visitors.
Firstly:
1- Login to the control panel.
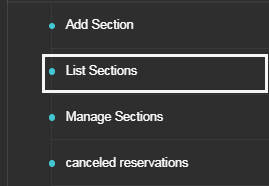
2- From modules list, select “Reservation”> then “List” as shown in the below picture:
3- Press the icon “Add” in front of the section you want to add content to as the below picture:

Secondly:
Login to the website homepage, and choose the section you want to add content to, then press (add).
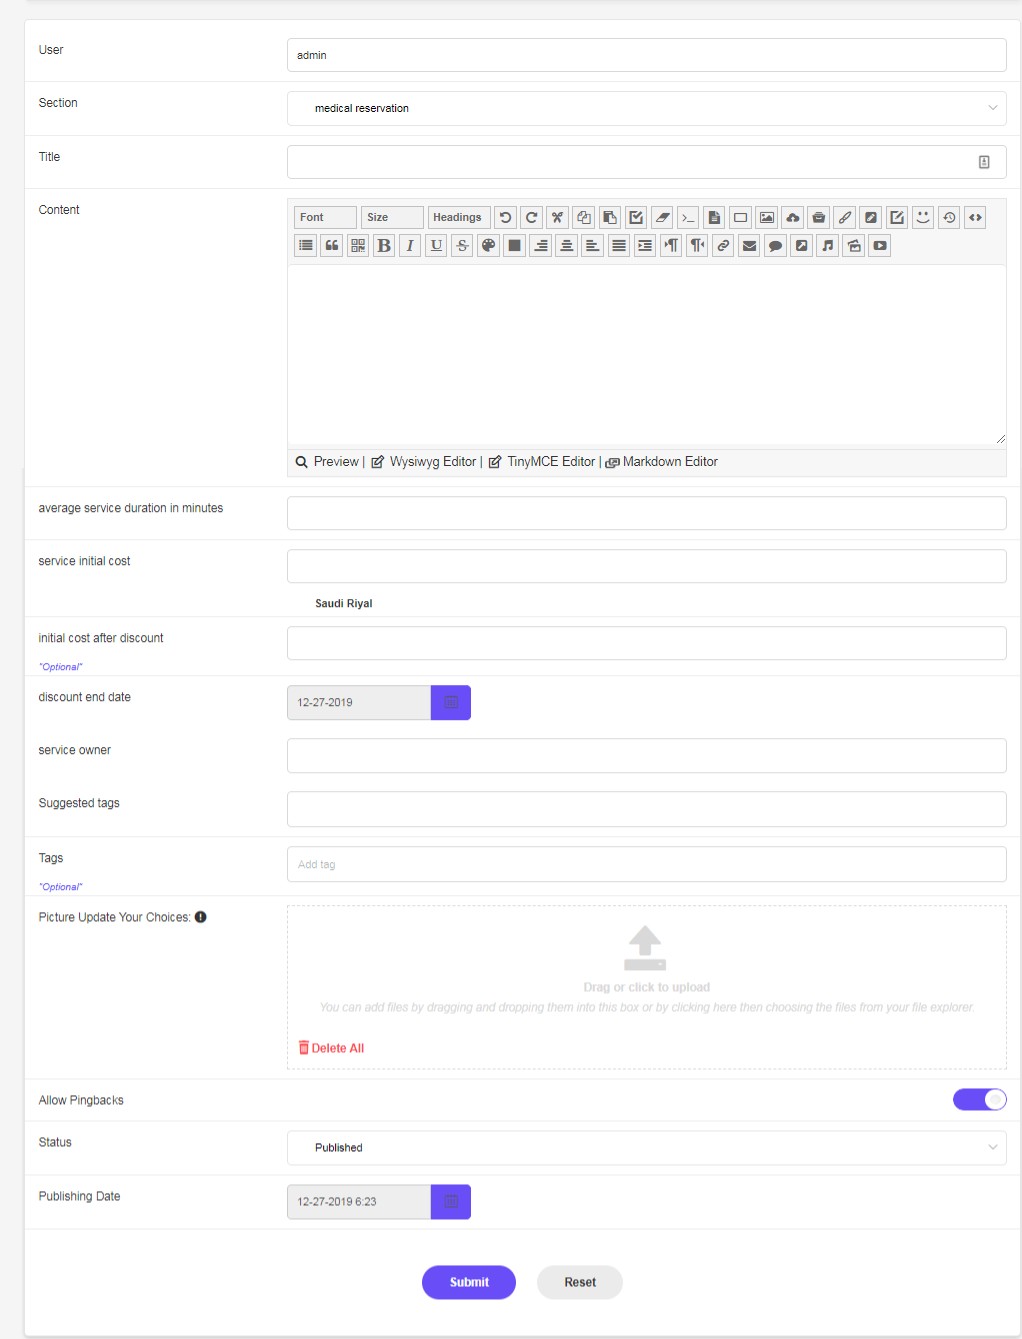
In both cases, the below template will show up:
Important Note: these template fields are shown based on the user’s permissions whether these permissions are for certain section or the whole CMS.
Adding Content Template:
-User: this option enables to add a name for the user that will publish the content.
Section: after pressing the section box, a dropdown list includes the sections, through which you can select the required section.
Note: only permitted sections are appeared to every user.
-Title: write down a head to the added content.
-Content: add the reservation content, noting that this field includes (Wysiwyg Editor) and (BBcode) through which you can move by one click.
-average service duration in minutes: set the time through which the service is provided.
-service initial cost: set the initial cost of the service selecting the required currency.
-service owner: enter the service provider name that may not be the website admin. If this box is empty the user name will be added as the service provider name.
-Suggested tags: every article has keywords that are used for searching in any browser. Accurate selection of these words helps in SEO and attract more visitors to your website.
Dimofinf V.5 provides you with some key words depending on the title. You can choose from these keywords or enter another ones in the (Tags) box.
-Picture: add one picture to the content, or leave it empty and the content is displayed without a picture. : you can use (drag and drop) to upload the picture or press the uploading icon. CMS allows you to upload multiple pictures at once considering the picture dimensions (height and width).
-Allow Comments (In case comments plugin is activated): by activating comments plugin, you can add different comments plugins valid in Dimofinf store such as (Facebook,Disquss…) all platforms will be shown in the same block highlighting every individual one.
Note: The comments block can be displayed on the internal pages of the module only, not all the website pages.
Firstly: activate (Allow Comments) option while you are creating the ad.
Secondly: follow the below steps if you don’t create comments block yet.
Activate (Default Layout) from the main menu, then press (Adding Block) on the side page. Select (Comments) block and drag it to where you want to be displayed. Mostly, it is displayed beneath the content block.
You can follow up the ad comments by pressing (Follow the Ad Comments), noting that visitors can not access this feature but only members.
A notification will be sent after adding any comment.
You may receive no more notification by pressing the same icon named subsequently ( Unfollow the ad comments).
Allow pingbacks: This feature helps in SEO as a digital marketing strategy. It consists of a group of external links “backlink” that refers to your website. For example, if a link that refers to a page of your website is included in any article published on other websites, this article will be recorded on your server. It is preferably to activate this feature for all content.
It is preferable to activate this feature for all contents using the (Ping an pingbacks settings) from Dimofinf settings list.
-Status: there is a list of options to set the ad status, that is shown only for the “Super Admin or “Admin”, and other members will show the allowed ones as per as permission given to them.
For example, if the “Super Admin” is only only is meant to publish ads, he may select (published) to launch the ad, or (pending) to be reviewed and published later.
-Publishing Date: set the date when the ad will be launched on the website.
Press (Submit) to add article, or (Reset) to re enter the data.
The content will be shown as below:

Reservation Schedule:
This schedule is used to set days and times when the reservations are allowed.
The service provider presses a day, and a timetable will be shown as the picture below:
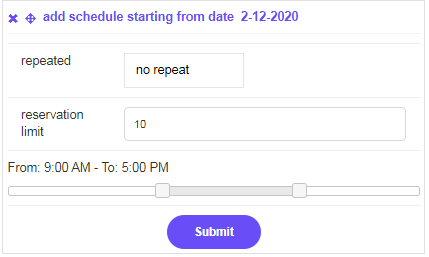
-Repeated: this box is used to set the number of the reservation repetitions.
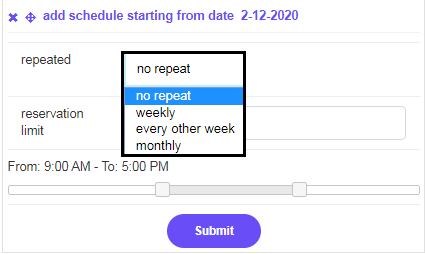
-reservation limit: enter the maximum number of allowed reservation on one day.
-Times scroll bar: this bar is used to set the allowed times for reservations.
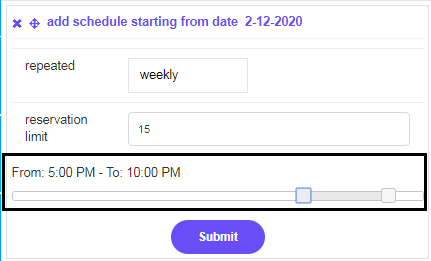
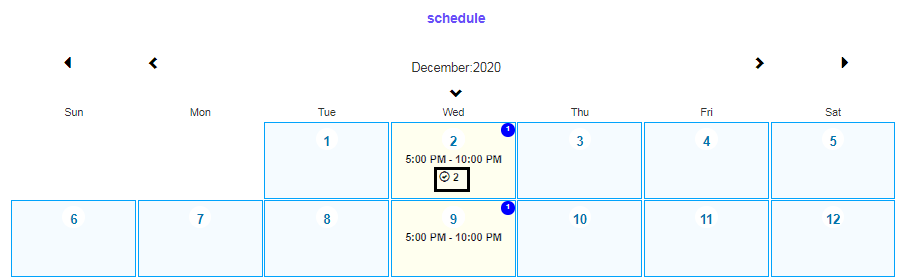
Press (Submit), assuming that the reservation is repeated on a weekly basis, so the schedule is shown as below:

The reservation days are colored in yellow, and the timetable number is shown right at the top.
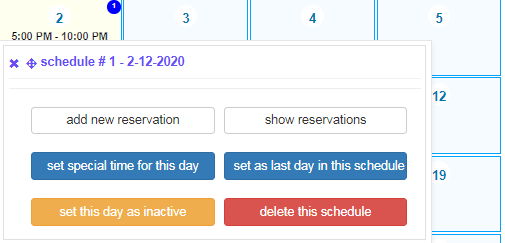
If the service provider presses any day, the below window will show up:
Firstly: Show reservation: press it to show the reservation of this day as the picture below:

Secondly: Add new reservation: press here so the service provider can add a new reservation:

-Client Note: add any note that is related to this reservation.
-Status: the status is (pending) by default, except if the admin has a permission to confirm the reservation, he can press (Confirmed).
Press (Submit), so the below icon will show up:
A notification will shown to the service provider as below:
Any pending reservation is shown in the (Awaiting confirmation) field:

Press the icon, so you can manage the pending reservations list:
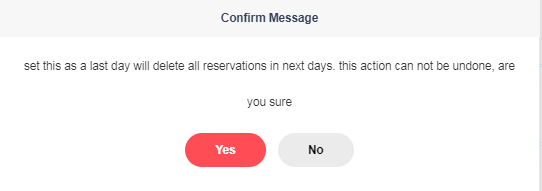
Thirdly: Set as the last day in this schedule: using this option will lead to cancel all the previous ones and a message will show up to confirm.
Fourthly: set a special time for this day: press here, so a window to adjust the reservation time of this day will be shown as below:

Fifthly: Delete this schedule: press this button to delete the whole schedule totally, and a notification will be shown as below:

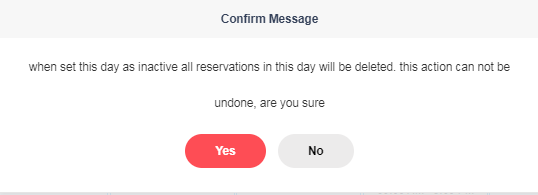
Sixly: set this day as inactive: it is used to cancel all the reservations of the day, and the below message will be shown to confirm:
-
If two reservations are crossed, box will be coloured in red. As the service provider chooses two different repetition methods, so the service provider need to active one of them:
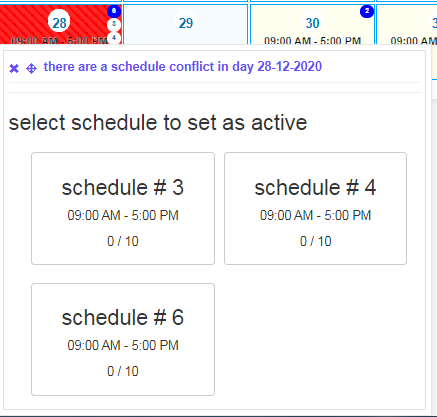
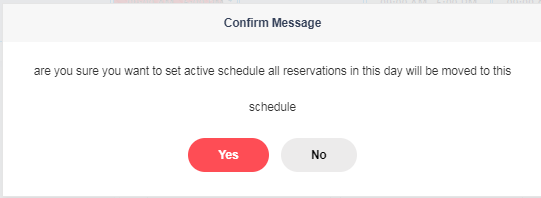
And the below message confirming that all reservations are moved to the selected schedule:
Reservation Icons:
Note: these icons are shown only to the service provider, only (ny reservation) icon is shown to the members.
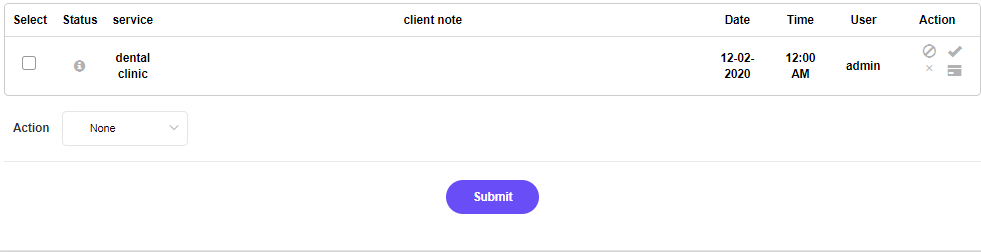
Reservation list: press here to show a list of the reservation as the picture below:
Press any reservation to see its details:

-Pending reservation: is used to see all reservations that are not confirmed yet.
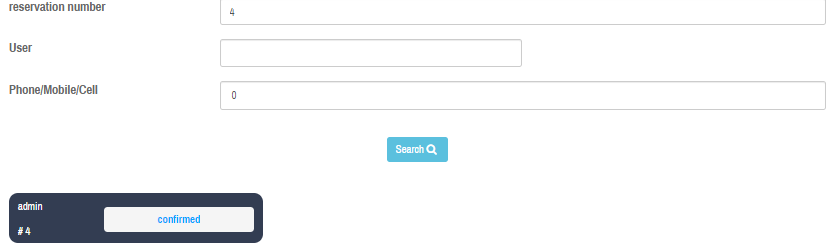
-Search in reservation: press here and the below box will appear:

This box is used to search for a reservation by phone number, reservation number or the service provider name, and the results are shown immediately as below:
-My reservation: press this icon to show all reservation related to this content:
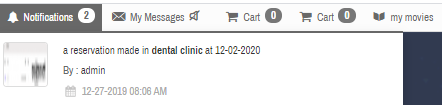
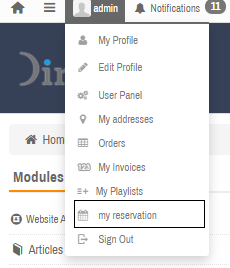
In case you want to show all reservations for all contents, press (admin) in the header, >then (my reservation), as the picture below:
Managing Reservation:
The first service reserved by the member is (pending) including many details such as name, cost, time, notes and some icons at the bottom to be explained later:

These buttons are:
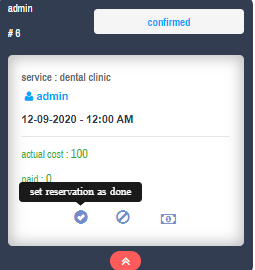
Confirm: the below message will show up after pressing this button:

Press (yes) to confirm, and another button will show up name (set this reservation as done) as the picture below:
After pressing this button, a box to enter notes will show up as below:

Add note, then press (Submit) to finish the reservation and the below picture will show up:
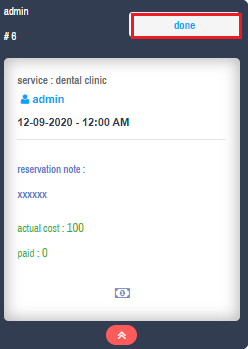
The difference between confirmed and done reservation is clear as:
Confirmed reservation: is a reservation that is not finished yet.
Done reservation: is a finished reservation.
-Cancel reservation: press (cancel) and the below message will show up:
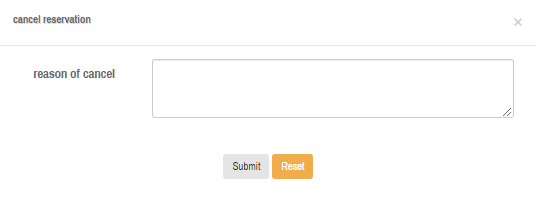
Enter the reason and press (submit), and the below picture will show up:

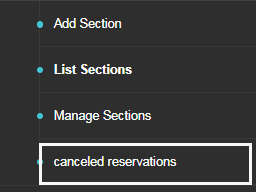
To view all the canceled reservations, follow the below:
From the modules list, select “Reservation”> then press “Canceled Reservation” as the below picture:
A list of canceled reservations, you can select all or certain ones as the below picture:

-Edit reservation payment: this tap enables to add the actual cost and the paid amount.

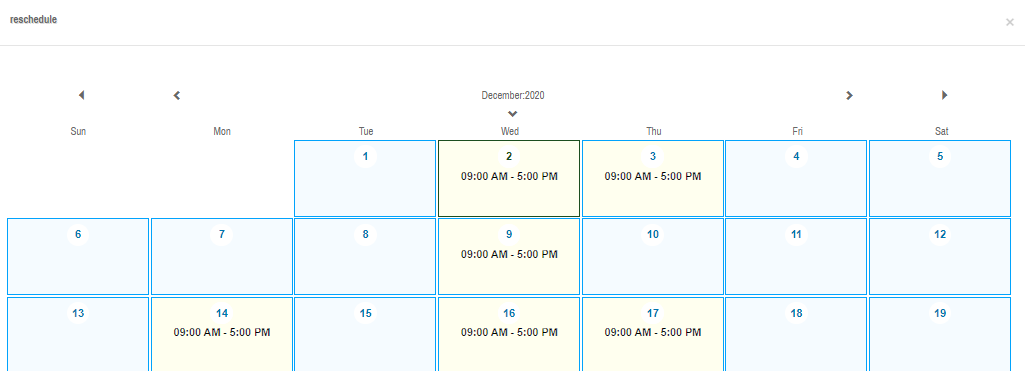
-Reschedule: this icon is used to change the reservation appointment.

The below window will show up to set the required appointment.